
This is default featured slide 1 title
Go to Blogger edit html and find these sentences.Now replace these sentences with your own descriptions.This theme is Bloggerized by Lasantha Bandara - Premiumbloggertemplates.com.

This is default featured slide 2 title
Go to Blogger edit html and find these sentences.Now replace these sentences with your own descriptions.This theme is Bloggerized by Lasantha Bandara - Premiumbloggertemplates.com.

This is default featured slide 3 title
Go to Blogger edit html and find these sentences.Now replace these sentences with your own descriptions.This theme is Bloggerized by Lasantha Bandara - Premiumbloggertemplates.com.

This is default featured slide 4 title
Go to Blogger edit html and find these sentences.Now replace these sentences with your own descriptions.This theme is Bloggerized by Lasantha Bandara - Premiumbloggertemplates.com.

This is default featured slide 5 title
Go to Blogger edit html and find these sentences.Now replace these sentences with your own descriptions.This theme is Bloggerized by Lasantha Bandara - Premiumbloggertemplates.com.
الجمعة، 29 أبريل 2016
The Freesia Flower
The Freesia Flower

The Freesia flower, a herbaceous member of the Iris family, is
regarded as one of the most fragrant plants in the world. Freesias are
grown for ornamental, as well as practical purposes and can be found in a
wide variety of colors, as well as varying fragrances - some stronger
than others. Freesia flowers are a beautiful bulb flower that is sure
to brighten up your garden! It comes in many beautiful colors and has a
very sweet fragrance that is sure to be enjoyable!
Freesias have been crossbred numerous times, and by many different cultures, which resulted in the development of a wide array of variations, all of which boast characteristics all their own.
The Freesia alba and Freesia leichteinii species became wildly popular after making their debut in the late 1800s, and they are still regarded as the most deliciously scented of all Freesia species.
 Scientific Name
There are 14 different species of Freesia flowers, and each one is
just as beautiful and fragrant as the last. The Freesia plant is named for Dr. Freese of Kiel,
Germany, who died in 1876, and following is a list of all the species
that currently scent the world with their irresistible fragrance:
- Freesia andersoniae
- Freesia caryophyllacea
- Freesia corymbosa
- Freesia fergusoniae
- Freesia fucata
- Freesia grandiflora
- Freesia laxa
- Freesia leichtlinii
- Freesia occidentalis
- Freesia refracta
- Freesia sparrmannii
- Freesia speciosa
- Freesia verrucosa
- Freesia viridis
- Freesia alba
 Geographic Origin
Although each variation grows well in hot, humid climates, the most
frequently seen species in the United States are the Freesia Alba and
the Freesia Laxa. So where did the Freesia come from?
The Freesia flower is a native of South Africa, and 12 of the 14 species originated in Cape Province. The remaining two, the Freesia viridis and the Freesia sparrmannii, are native to the African tropics. The Freesia fucata is the only species found north of the equator in Sudan.
The Freesia flower is a native of South Africa, and 12 of the 14 species originated in Cape Province. The remaining two, the Freesia viridis and the Freesia sparrmannii, are native to the African tropics. The Freesia fucata is the only species found north of the equator in Sudan.
 Description and Characteristics
Few individuals can look at a Freesia flower and not feel
their spirits lift just a little. Very ornate and artistic in their
design, Freesias can feature up to 10 single or double flowers, which
are complex bell-shaped blooms originating from a tuft of narrow and
sparsely arranged leaves. The base of the flower's bloom is
funnel-shaped, and the stems measure anywhere form 10-44 cm tall.
The plant is tender to the touch, which belies its tenacious personality, and features sword-shaped leaves. The stalks are slender and reach approximately one foot in height when fully grown.
The stem typically bends sharply so that the face of the bloom tilts upward, as if determined to be seen. Freesia flowers are undeniably the "individualists" of the plant world. Pink or white freesias probably come to mind first when discussing Freesias, but these flowers can also be found in the following colors:
- Dark Purple
- Red
- Fuchsia
- Orange
- Mauve
- Yellow
- Beige
- Lavender
This creates a vast array of choices when planning to use freesia bouquets for special events or weddings. Many of the colors were the result of cross breeding, and it is certainly realistic to think that there may be more colorful variations produced in the coming years.
 Meaning
Most of the world's flowers are associated with some significant meaning or symbolize one or more cultural or religious customs, and this is true for the Freesia flower, as well. Freesia flowers have long been the symbol of friendship and innocence.
The fragrant flower is also listed as the 7th wedding anniversary flower, making Freesia bouquets lovely gifts for such occasions. Many wedding cake designers feature this flower for the decorative "icing buds" that adorn most wedding cakes, which adds a whimsical touch to such cakes, or other tasty creations.
The fragrant flower is also listed as the 7th wedding anniversary flower, making Freesia bouquets lovely gifts for such occasions. Many wedding cake designers feature this flower for the decorative "icing buds" that adorn most wedding cakes, which adds a whimsical touch to such cakes, or other tasty creations.
 Cultivation and Care
Although native to South Africa, the Freesia plant is now widely grown in gardens all over the world. Freesias like a humid atmosphere, and prefer very warm temperatures. They thrive without much human involvement in areas like Florida, and other parts of the southeast.
They can also thrive in certain areas of the northeast during the hottest months of the year. They will freeze and die quickly when temperatures become cold, and will not thrive even in warm climates like the southwest, where the air is dry, rather than humid.
Growing Freesias
Those wondering how to plant Freesia bulbs properly will be pleased to discover that this is not a difficult task. The subsequent care and cultivation of the Freesia plant is also not a complicated endeavor as long as the gardener follows a few basic guidelines. The garden bed should be situated where it will receive direct sunlight as much as possible throughout the day.
Prior to planting, it is important that the soil be dry and even.The bulbs should be planted in clusters of four or five, at a minimum of four inches apart. They should be planted at a depth of about five inches with the face of the bulbs tilted upward. Bulbs placed in pots should be spaced two inches apart.
Immediately after planting, the garden bed should be watered until the top six inches of soil is moderately moist.Potted Freesias should be watered only until the excess moisture begins to drain slightly from the pot's bottom.Once the plant blooms, a soluble bulb fertilizer should be applied to the soil.
There is an old wives' tale that adding sugar to the water used to hydrate one's garden will help the plants to grow, but this is not sound advice. During the process of photosynthesis, plants manufacture all the sugar they need, so this is one case where mother nature is smarter than the gardener. To add household sugar to the water used to hydrate plants is ineffective and many times, harmful.
The garden's soil should be kept a bit moist from their planting until early summer when they flower. After the flowers have bloomed, the moisture should gradually be decreased until it is time to bring the plants into the house for the winter.
The best time to transplant the Freesia is late August or early September when the root system is well established, and a warm, east-facing window is the ideal place for a potted Freesia.
 Diseases and Pests
Most insects and other garden pests are not partial to the Freesia flower,
and they typically stay disease free with the appropriate care.
However, the mosaic virus, if contracted, will quickly harm the plant at
the root level, and if discovered, it is wise to remove the affected
plants, as the mosaic virus spreads quickly.
 Uses
Uses
The Freesia flower's strong scent is all part of its charm,
and for this reason, many gardeners choose to add this flower to their
repertoire. The species most commonly cultivated for its practical uses
is the Freesia refracta, which was crossbred with the Freesia
leichtlinii in the mid 1800s. Many cultivators have produced this
species for the sole purpose of manufacturing shampoos, conditioners, and scented body lotions.
It is also widely used to scent perfumes and body sprays. The Freesia fragrance has recently gained popularity as a scented oil for use in vaporizers, smoke-free incense burners and manufacturing of scented candles and potpourri
It is also widely used to scent perfumes and body sprays. The Freesia fragrance has recently gained popularity as a scented oil for use in vaporizers, smoke-free incense burners and manufacturing of scented candles and potpourri
 Pictures
Click thumbnails to see pictures:
 |
 |
 |
الخميس، 28 أبريل 2016
The Dahlias Flower

The dahlia hybrids are most
often seen as garden plants. Anders Dahl was an 18th-century Swedish
botanist for whom the Dahlia flower is now named after.
There’s so much more to this remarkable perennial than just where its name comes from. Here is some important information you should know about the Dahlia.
There’s so much more to this remarkable perennial than just where its name comes from. Here is some important information you should know about the Dahlia.
Scientific Name
The Dahlia or Dahlia hortensis, as it’s called by its
scientific name, is a bushy perennial that is easy to spot. As of today,
there are more than 50,000 types of dahlias be cultivated. This flower
belongs to the Compositae family.
Geographic Origin
Dahlias are native to northern South America, Mexico and
Central America. The Spaniards took them to Europe after they had first
been cultivated by the Aztecs. Dahlias made a splash in Europe
decorating many gardens.
Roots of the dahlia flower were sent by box from Mexico and then to Holland back in 1872. This box contained a tuber which later became a red flower. Since the bloom of that red flower, dahlias were right back on the breeder list with other plant species so new hybrids could be born.
Roots of the dahlia flower were sent by box from Mexico and then to Holland back in 1872. This box contained a tuber which later became a red flower. Since the bloom of that red flower, dahlias were right back on the breeder list with other plant species so new hybrids could be born.
Description and Characteristics
This flower comes in various colors, sizes and shapes. The different
sizes, color, height and petal shape allow you to characterize the
different species. That’s why landscapers and florists love it so much.
You can spot the dahlia by the rings of petals. The smaller dahlias have been known to grow up to 1 to 3 feet tall and their flowers get up to 2 to 4 inches in diameter. However, the larger ones can reach up to 6 feet tall with flowers up to 12 inches in diameter.
Flower Colors
You can spot the dahlia by the rings of petals. The smaller dahlias have been known to grow up to 1 to 3 feet tall and their flowers get up to 2 to 4 inches in diameter. However, the larger ones can reach up to 6 feet tall with flowers up to 12 inches in diameter.
Flower Colors
- White
- Yellow
- Orange
- Pink
- Purple
- Red
Pedal Edges
- Long or Short
- Pointed or Round
- Uniformly or Irregularly Spaced
- Curled at the Edges
Meaning
The dahlia signifies dignity and elegance. Not only that it
also brings with it change, betrayal, travel, and warning. The flower
also stands for diversity. Most flowers have two genes; however, the
dahlia has eight.
For this, it’s called the Houdini of the garden due to its wondrous shapes, sizes and colors. Many who grow dahlias refer to them as “queen of the autumn garden” because they last from mid-summer to early frost.
For this, it’s called the Houdini of the garden due to its wondrous shapes, sizes and colors. Many who grow dahlias refer to them as “queen of the autumn garden” because they last from mid-summer to early frost.
Cultivation and Care
Dahlias can handle almost any type of weather. However, if you
want the best results, grow them in full sun and in soil that has a lot
of organic matter mixed in. You can buy dahlias as seeds, but it may be
better to buy them as bulbs or tubers.
Here are some things to know whichever way you decide to buy them:
Here are some things to know whichever way you decide to buy them:
- If you’re growing them just for cutting purposes, plant them in rows for easy access and for tying in.
- For the first year, treat your dahlias as half hardy bedding plants. By this, I mean put your bulbs under glass before planting them in the ground. Then, once you’ve had your last frost for the year, you can go ahead and plant them in your garden.
- When you begin to plant your bulbs for growth, put dry soil into trays and bury them in it. You can also use sand or compost. Put the tray in a cool, dark place where frost can’t get to it and make sure just the old stem is showing. When the new shoots begin to come up about half an inch, you can put them into the light.
- If you live in Britain, be sure to sow your dahlia seeds in February and March in a greenhouse and make sure you plant the seedlings after all signs of frost are gone.
- It’s time to plant the flowers so they bloom in May. If you have tall growers stake them immediately because the wind could damage them.
- If you want a normal garden arrangement, the flowers can take care of themselves for the season. Of course you’ll have to do the occasional dead-heading and little maintenance to keep it looking nice, but very little work is needed.
- Blooms for cutting and showing, feed them on a regular basis with the highest quality potash liquid feed. For example tomato feed. Also, use disbud for larger and fewer flowers.
- When autumn frosts begin to arrive, it’s time to check to see if you need to protect your dahlias. If so, simply cover them.
Diseases and Pests
Dahlias are a breed of flower that can be vulnerable to
several types of pests and diseases. That is the one drawback to having
such a beautiful flower in your garden.
Here are some pests and diseases to watch out for:
Here are some pests and diseases to watch out for:
- Slugs- Slugs love to prey on dahlias. The best way to get rid of them is to use slug pellets. These have proven affective and won’t hurt your flower either.
- Earwigs-This particular pest attacks the flowers and buds. The best way to stop them is to clear away any debris around the plant where they can hide. Also, try upturning a flowerpot on a cane. The next day you can get rid of any earwigs that have hidden under the pot from the night before.
- Aphids-This pest likes to attack buds and fresh shoots. They can also expose your plant to disease so make sure you spray early and regularly.
- Fungal Infections-Believe it or not, dahlias can rot and mildew. They can also wilt which produces stunted and discolored plants. To prevent this, control the disease carrying aphids and use protection on your dahlias. However, once fungal infections happen, there is no cure so if this does happen, you’ll need to burn the infected plant as soon as possible.
Uses
The blue dahlia is a unique and beautiful flower. When
planting this type of perennial, make sure you follow the instructions
on care and maintenance because there are some flowers that prefer sun
over shade and some who prefer shade over sun.
Like all flowers, good care and maintenance can lead to great expectations with luscious blooms.
Like all flowers, good care and maintenance can lead to great expectations with luscious blooms.
Pictures
Click thumbnails to see pictures:
 |
 |
Aster

Asters can be annuals or perennials, depending on the variety. These are easy to grow, but require full sunlight. Asters should be planted at least 18 inches apart from one another because, as they grow, they form little bushy clumps. If you are working with annual asters, do not plant them in the same spot of the garden every year, but rotate them.
Smaller varieties of aster, which can be planted as close as six inches apart, can make a lovely border for a garden area. Larger varieties should go further back into the garden, to create a backdrop.
When arranging Asters into a vase or bouquet, the sturdy stalks should be cut low. A small, round container with a bundle of Aster is splendid, but Asters can also showcase a larger flower that would rise from behind the bouquet.
الأربعاء، 27 أبريل 2016
Foods For Energy Boost!
Foods For Energy Boost!

An extreme feeling of sleepiness or lack of energy can be called
fatigue. Many factors can lead to fatigue, including: stress, a medical
disorder, strenuous exercise, or your diet. Often, it is the foods we
choose that cause fatigue, but we can make better choices to improve our
energy levels. By combining different energy foods, you can decrease
the likelihood of experiencing fatigue.
Sweets or high GI (glycemic index)
foods such as cookies, cakes, white rice, and white bread are all made
from refined flour which falls into the category of processed foods.
These grains are so heavily milled that all the nutrition has been
crushed out of them. The only part that is left is the pure starch which
is quickly absorbed into the body; causing blood sugar spikes. The
temporary rush may make you feel as if you have a lot of energy, but it
only lasts a short time and you will experience a sugar crash later. It’s a bad cycle to be on.
You have to have carbohydrates in your diet. There are different
types of carbohydrates and some are very beneficial in regulating blood
sugar levels. Whole grains are much better, they contain more fiber and
will last longer in your system with less blood sugar spikes – for your
information, these foods are classified as low GI (Glycemic Index).

Here’s something you should know: whole grain foods generally have a significantly lower GI than refined grain foods.
Eating frequent meals is one of the best ways to keep high energy
levels throughout the day. Watching your food combinations will be a
great help as well. Eating whole grains along with proteins can help
prolong high energy.
Being even mildly dehydrated can leave you feeling tired and
fatigued. Fruits are high in water-content and contain many nutrients;
making them the perfect way to have a snack and get a great source of
hydration.
Dairy products can be a great help also as they offer a lot of
protein and good carbohydrates. In the morning or during the middle of
the day, a bowl of oatmeal as a snack will offer great carbohydrates to
provide you with some energy boost. Foods with a lot of fiber take
longer to digest and therefore last much longer in your system. This
means they release energy for a longer period of time: keeping you full
for longer. These foods also help to keep blood sugar levels steady,
hence your energy level will stay stable, instead of fluctuating. Foods
like beans are a great source of fiber and protein, which has earned
them the title of superfoods by many dieticians.
High protein foods like eggs are an excellent source of slow-releasing energy. Here are several excellent high-protein foods:
- Egg – an egg has 6 grams of protein along with iron and zinc. Eggs can also help regulate blood sugar levels while providing vitamin B which is well known for energy.
- Nuts have both fiber and protein. Combining them with eggs help to boost energy and sustains it steadily throughout the day. Bananas are a great source of potassium; which helps long term by fighting muscle fatigue.
- Mushrooms are little miracles when it comes to energy and nutrition. Vitamin B, (pantothenic acid, niacin, and riboflavin), is a good source of thiamin and vitamin B6. Aerobic energy production and protection of the mitochondria from damage are just two of the ways in which your system will benefit from riboflavin. Pantothenic acid fights fatigue from stress by helping the adrenal glands. And with its niacin content, the food you consume is turned into energy.

You can replace coffee with tea because tea contains Theatine which
actually helps you stay alert. Of course, you also get and you get a
little boost from the caffeine: about 30 to 50 mg per cup. This is about
half that of coffee. Another secret wonder are chia seeds. These
increasingly popular little seeds have a long history of improving
performance and endurance. The big secret they are hiding is the wealth
of nutrition they have. One tablespoon has 5 grams of fiber to stabilize
blood sugar levels and omega 3 acids to help keep your heart healthy.
Always avoid energy drinks as they are loaded with lots of sugar – this
causes you to experience sugar crashes several hours later – and
artificial sweeteners,which weaken the immune system over time.
Tillandsia stricta
Tillandsia stricta
Common name: Tillys, Air Plant, Airplant, Erect Tillandsia, Upright Air Plant
Family: Bromeliaceae
Synonymous: Anoplophytum strictum
Tillandsia rosea
Tillandsia conspersa
Anoplophytum bicolor
Anoplophytum krameri
Tillandsia langsdorffii
Tillandsia krameri
Tillandsia rosea
Tillandsia conspersa
Anoplophytum bicolor
Anoplophytum krameri
Tillandsia langsdorffii
Tillandsia krameri
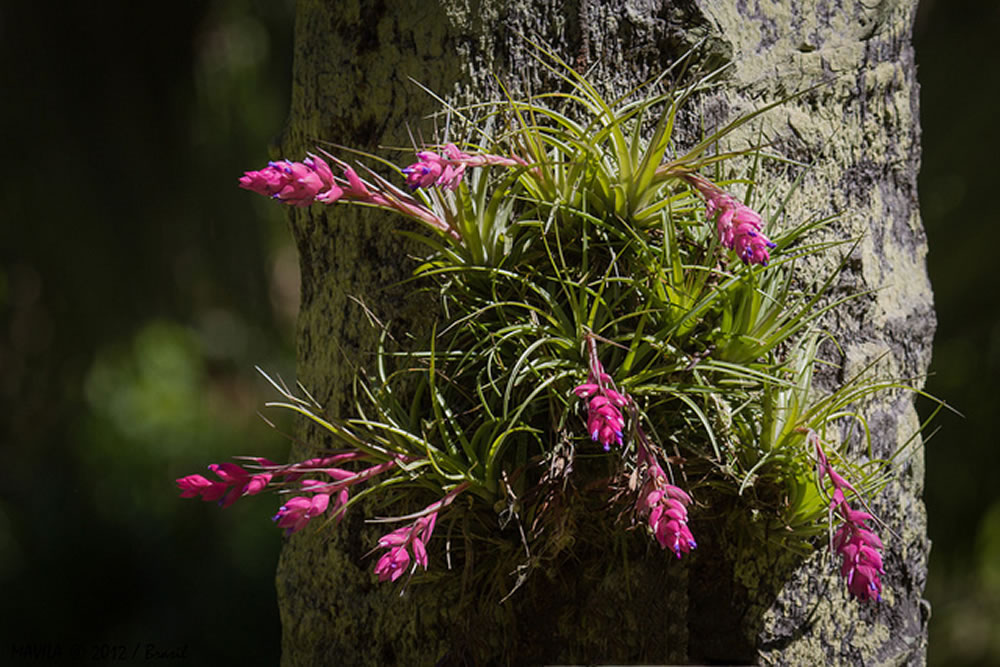
Distribution and habitat: Tillandsia stricta
is native to Venezuela, Trinidad, Guyana, Suriname, Brazil, Paraguay,
Uruguay, northern Argentina, growing either on both the sands of beach
dunes and in trees in the foothills of the Atlantic Range. This means
that this plant has adapted to lots of different climates and would have
leaves to match this diversity.
Despite the fact Tillandsia stricta is typically an epiphyte, growing upon another plant to collect light, water and nutrients, it is not an parasite plant. These plants use their roots only to anchor upon their host and they rely solely on leaves to absorb water and nutrients.
Despite the fact Tillandsia stricta is typically an epiphyte, growing upon another plant to collect light, water and nutrients, it is not an parasite plant. These plants use their roots only to anchor upon their host and they rely solely on leaves to absorb water and nutrients.
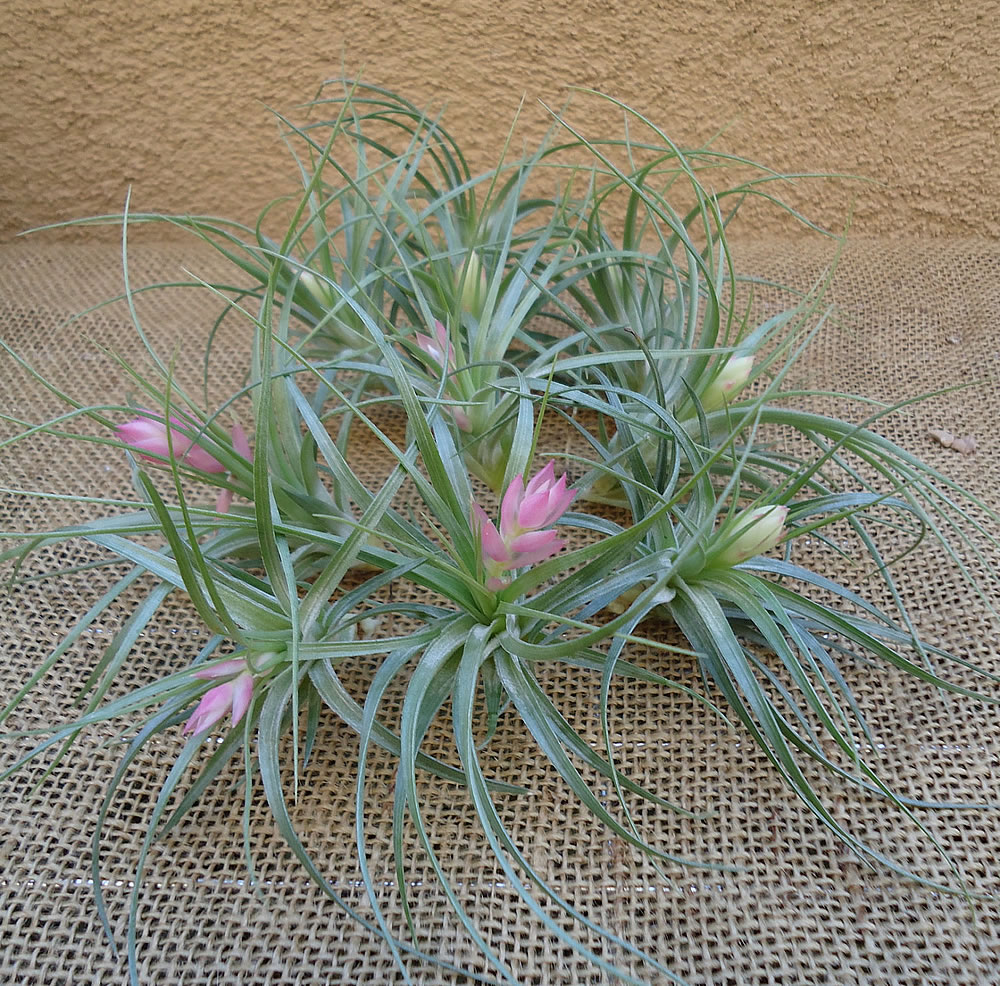
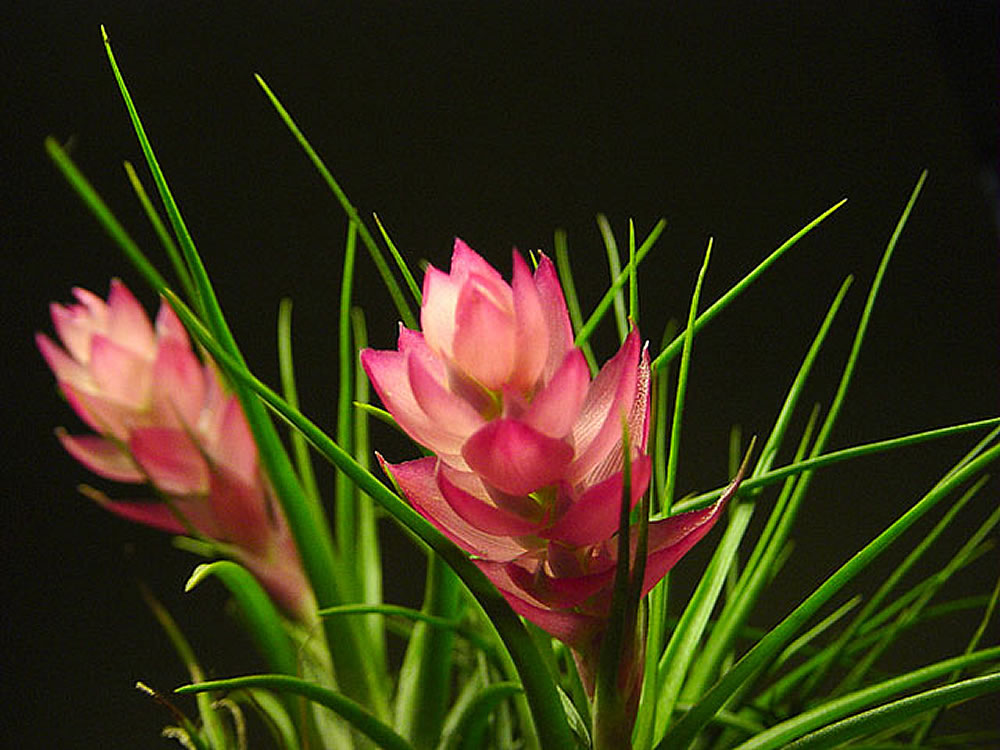
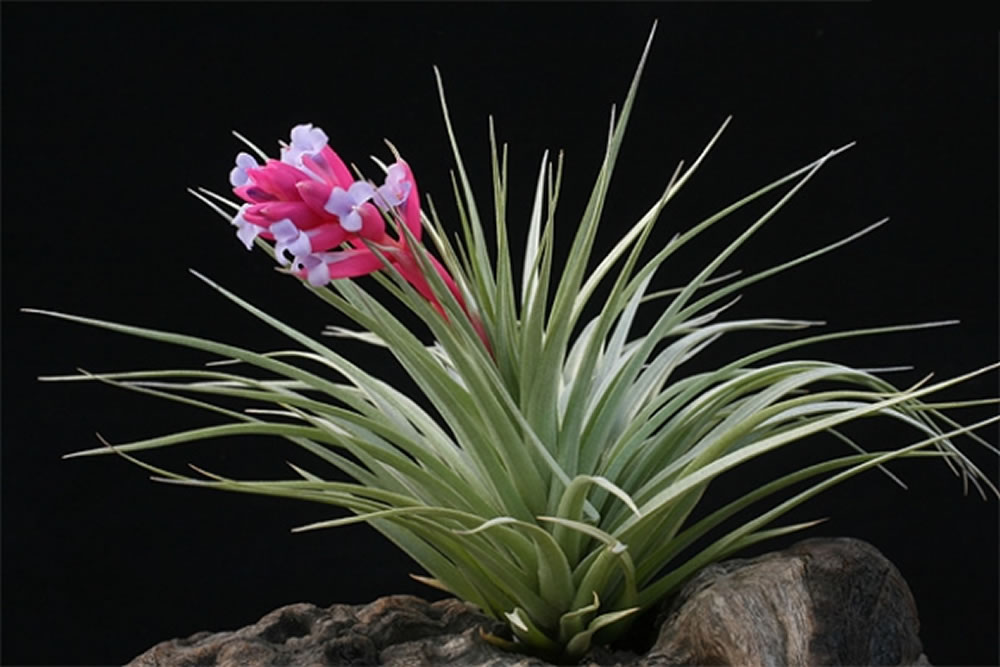
Description: Tillandsia stricta are
evergreen, clump-forming, short-stemmed, epiphytic perennials with
leaves arranged into thick rosettes. They are a compact species to about
10cm (4 inch) across. There is a large number of variations that can be
found in Tillandsia stricta plants: from soft leaved specimens
to much harder, stiffer types and different coloured forms from light
green leaves to silvery leaves and even verging on black. In early
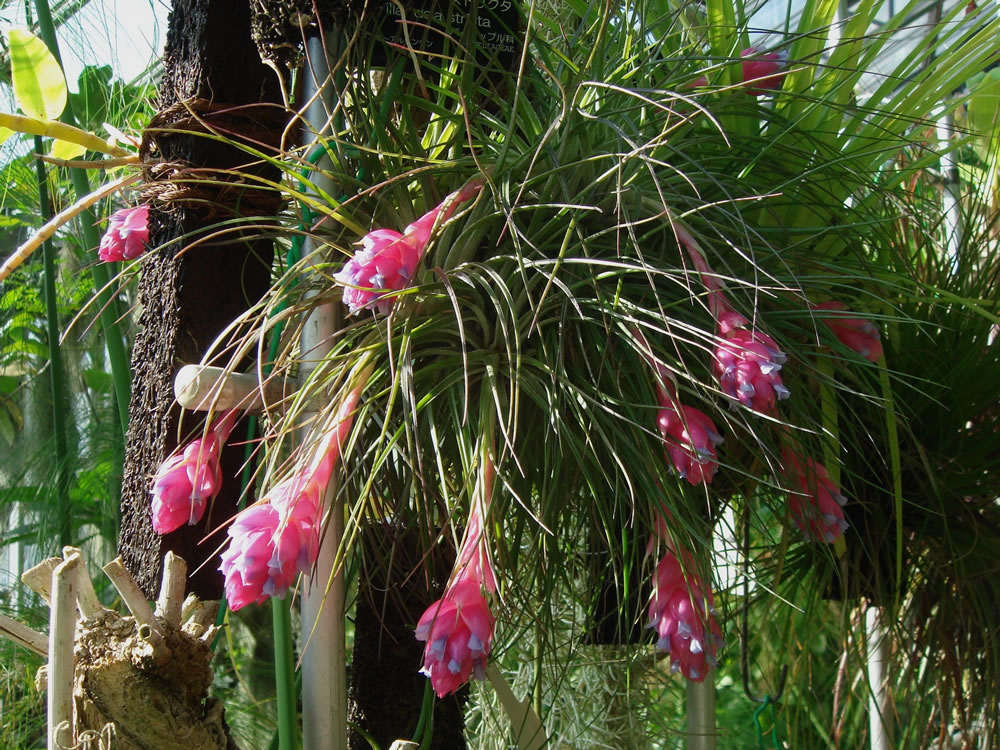
summer, they produce, when mature, bright red or bright rose bloom
spikes with bright blue flowers. The spike is first held upright but
then droops as it lengthens. The actual flowers are not long-lived,
lasting for about a day at best, before it starts wilting, but the
colourful bracts remain attractive for up to 10 weeks.
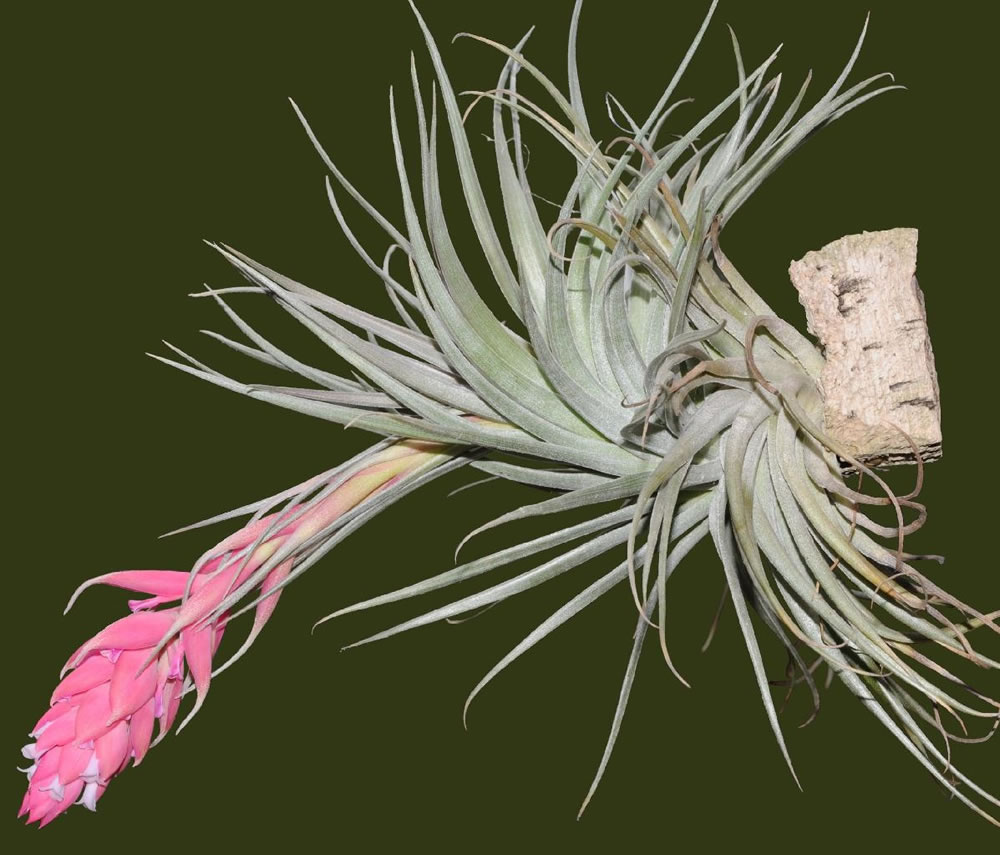
Tillandsia stricta hard leaf is one of the most vibrantly colored blooms in the genus and form a wonderful clump over time. The forms of Tillandsia stricta with gray-scaly, pale green leaves are adapted to take more sunlight than the green forms.
Tillandsia stricta plants, like other airplants, have little or no roots and absorb most or all of the water and food through their leaves. The eventual roots are used by these plants only to attache themselves to rocks or tree hosts.
The origin of this plant’s scientific name epithet (stricta) means ‘erect’ and describe the upright habit of this plant.
House plant care: Tillandsia stricta, after
the initial introduction into their new home (about a month), have a
much better chance of surviving in home condition than a potted plant.
These plants are extremely adaptable, require low maintenance and can
withstand some time of neglect.
Light: Bright filtered light is the general rule for Tillandsia stricta
plants and the higher the humidity of the air the higher light will be
tolerated. Place them at no more than 3m (10 feet) from the window.
Direct sunlight may cause sunburn and leave unsightly marks on plants.
Tillandsia stricta can be grown in artificial light. Full spectrum artificial light (fluorescent) is best. The plant should be placed no further than 90cm (35 inch) from the fluorescent tubes and can be as close as 15cm (6 inch). A four-tube 122cm (48 inch) fixture works well. Bulbs can be any full spectrum type. Incandescent bulb are not suitable for plants grow lights. Provide 12 hours light per day.
Tillandsia stricta can be grown in artificial light. Full spectrum artificial light (fluorescent) is best. The plant should be placed no further than 90cm (35 inch) from the fluorescent tubes and can be as close as 15cm (6 inch). A four-tube 122cm (48 inch) fixture works well. Bulbs can be any full spectrum type. Incandescent bulb are not suitable for plants grow lights. Provide 12 hours light per day.
Temperature: Optimum temperature range for Tillandsia stricta
is 10 to 32°C (50-90°F). They also need moving air, not closed stale
conditions. During the summer it is recommended to move this plant
outside, in a shaded position to benefit from fresh air.
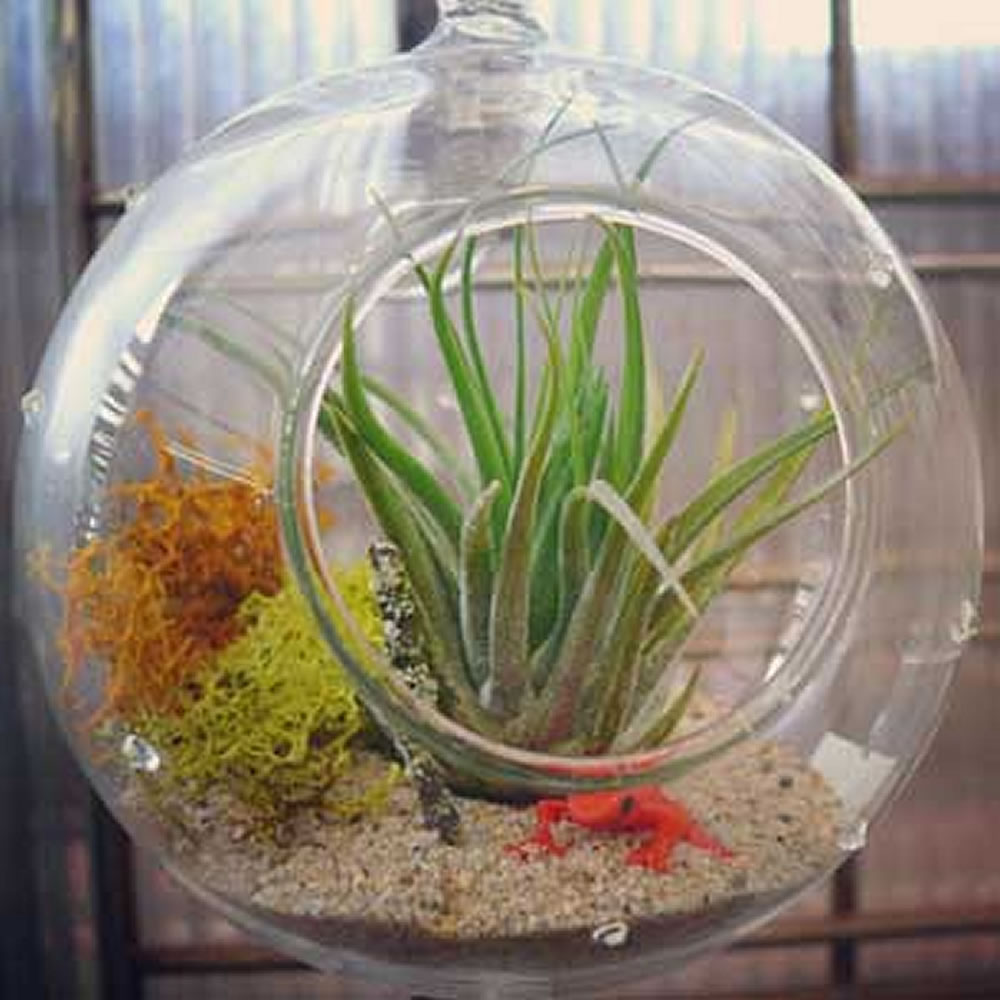
If Tillandsia stricta is kept in a terrarium, make sure they have air openings and is not placed where sunlight could magnify heat through the glass housing. An occasional placement in an shady outdoor place for a day can revive it.
If Tillandsia stricta is kept in a terrarium, make sure they have air openings and is not placed where sunlight could magnify heat through the glass housing. An occasional placement in an shady outdoor place for a day can revive it.
Watering: Thoroughly wet Tillandsia stricta
once a week; more often in a hot, dry environment; less often in a
cool, humid one. Soak them (fully submerged) for 30 minutes to an hour,
then shake them and allow to almost completely dry before replacing them
in their globe or any kind of enclosure. If the plant is boasting a
flower bloom, do not submerge the actual flower (just the body of the
plant) as the esthetic appeal of the flower is permanently compromised.
Do not use distilled water or softened water. Filtered water, tap water that has sat long enough for the chlorine to dissipate, bottled water are fine. Pond water, aquarium or rain water are all preferred.
Plants should be given enough light and air circulation to dry in no longer than 4 hours after watering. If the plant dries within a very short period of time, it is not hydrating at all.
Spray misting is insufficient as the sole means of watering but may be beneficial between regular waterings in dry climates to increase the humidity.
If the plant is in a shell, be sure to empty the water out. Tillandsia stricta will not survive in standing water.
It is much better to water in the morning than at night. Airplants absorb the carbon dioxide from the air at night instead of the day time. If the plant is wet, it does not breath therefore, unless it can dry quickly at night, plan on morning baths.
Feeding: For Tillandsia stricta plants
fertilising is not vital. Occasional fertiliser in water will speed up
the growth, reproduction of pups and gain a more vibrant bloom. Apply a
water soluble foliage fertiliser at quarter strength recommended on the
label only during the warm months of reproduction.
Mounting: Tillandsia stricta can be grown
basically anywhere, on rocks, in a seashell or on coral, in ceramic or
pottery, attached to wood, but first should be considered how the plants
are going to be watered. Also they should placed in a position
accordingly with plants need for light. The following attaching
materials are suitable to be used in air plants mounting: waterproof
glue, plumbers glue, goop, shoe glue, Tilly tracker, fishing line,
twisty ties, strings or even nails. Only use nails and stapling to tie
around the plant. Nailing or stamping through the body of the plant will
kill it. Also, do not not use superglue or copper wire as these will
kill the plant.
Propagation: At the base of the mature plants will
appear one to three pups or young plants that will grow to replace the
mother plant now blooming that will degrade and die soon after. They
will take a year to grow as large as their mother. The plant will
multiply during the year with simultaneous blooms in a whole clumping
community. The clump can be left to continuously grow or separate one or
more pups to start new families. It is important to allow the pups to
grow to 1/3 or half of the size of the original plant before removing it
from the parent plant. To separate the pups, grip with one hand the
base of the mother and the base of the grown up pup in the other hand
and tug apart with a slight twist. It should be easy to separate them
and will not hurt the plants.
Tillandsia stricta is one of the fastest growing tillandsias from seeds. There are many cultivars of this species. Tillandsia stricta has been used in hybridization with other species such as Tillandsia albertiana and Tillandsia recurvifolia to obtain new hybrids that exhibit characteristics of both species.
Tillandsia stricta is one of the fastest growing tillandsias from seeds. There are many cultivars of this species. Tillandsia stricta has been used in hybridization with other species such as Tillandsia albertiana and Tillandsia recurvifolia to obtain new hybrids that exhibit characteristics of both species.
Gardening: Tillandsia stricta are curious plants that may be grown outdoors as long as temperatures do not drop below 7°C (45°F).
Position: To grow Tillandsia stricta,
locate this plant in a well ventilated place where there is under a
shade with lots of indirect daylight and protection from hot sun. A
brief morning or evening sun – about 1 hour – is fine especially for the
northern climates.
Irrigation: In temperate climate with some humidity, Tillandsia stricta
hanging in a tree may never need to be watered. Otherwise outdoor
plants can be sprayed with a water hose twice a week for 5-6minutes and
let to dray in plenty of day light. Misting them once a week is helpful
but is not a substitute for soaking.
If grown outdoors, keep dry during winter.
If grown outdoors, keep dry during winter.
Fertiliser: From mid spring through fall, mist daily and once a month, mist with quarter strength water soluble fertiliser.
Problems:
Do not plant Tillandsia stricta in soil and do not allow them to stay wet for long time as they are prone to root.
Treatment: Rotting areas on plant need to be removed to prevent spreading the rot.
Do not plant Tillandsia stricta in soil and do not allow them to stay wet for long time as they are prone to root.
Treatment: Rotting areas on plant need to be removed to prevent spreading the rot.
Most commonly, Tillandsia stricta die as a result of water setting in the centre of the plant for too long.
Under-watering is evidenced by an exaggerating of the natural concave curve of each leaf, void of vitality or brown tipped leaves.
Treatment: Soak the plants as indicated on watering section.
Treatment: Soak the plants as indicated on watering section.
Lighter colour in leaves is a sign that the plants needs more daylight.
Note: Tillandsia are some of the oldest members of
the plant kingdom. This genus includes over 600 species. Not all of the
600 plus Tillandsia species are easy to maintain and cultivated as
ornamental plants. On average, there are approximately 40-60 species
available for sale and an appreciable number of hybrids and cultivars.
Buying tips: Steps that should be taken upon arrival
of new air plants are the following: To reduce the plant stress, give
them a bath for about 20-30 minutes. Simply soak them in a bowl of
lukewarm water. Next lay them out to dry completely. Then they can be
planted in a glass terrarium, mount them on a wall display or use them
in other arrangements. The unsightly roots, if any, can be cut off and
the brown leaves can be peeled off.
Do not fertilise plants for three weeks following their arrival, but be sure to follow directions for light and water.
Do not fertilise plants for three weeks following their arrival, but be sure to follow directions for light and water.
Holidays: To leave alone the plant for over two weeks, soak Tillandsia stricta in water for 12 hours before going in holiday and again for 12 after returning from holiday.
Another option is to set them outdoors in all day shady area where the automatic water sprinkler system can water them twice a week.
Another option is to set them outdoors in all day shady area where the automatic water sprinkler system can water them twice a week.
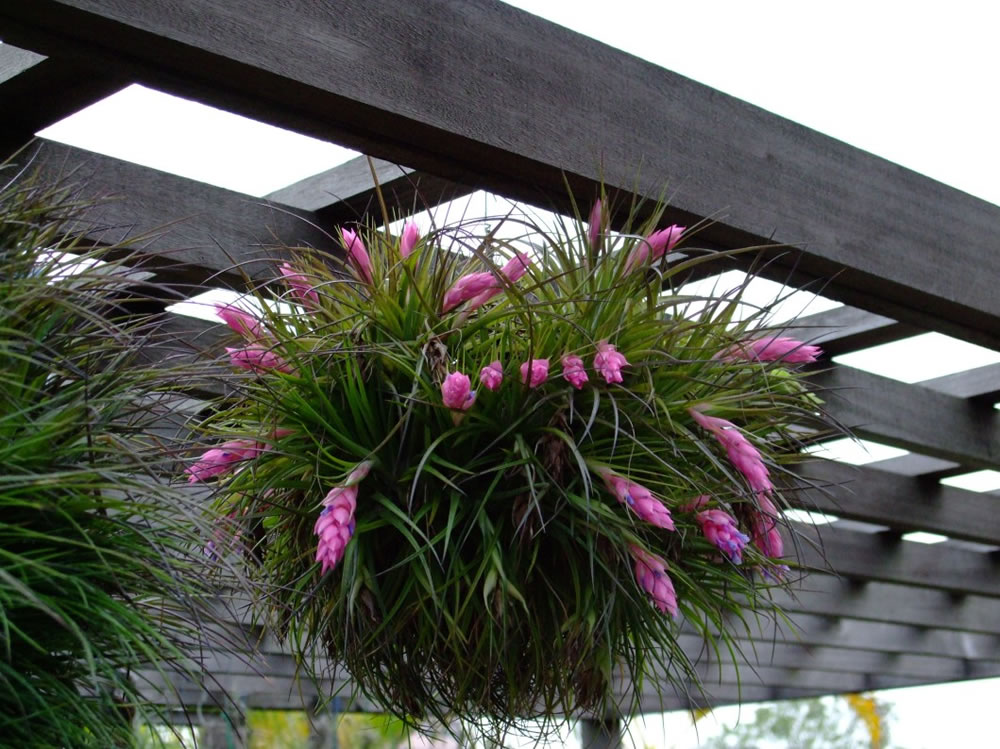
Uses and display: Tillandsia stricta plants
are suitable for epiphyte branches. They can be displayed to grace a
tabletop, adorn the walls, drape across windows or nest among other
plants. Tillandsia stricta grown in glass globes are becoming very popular and trendy way to display. Outdoors, grow Tillandsia stricta
plant in dappled (partial) shade mounted upon a tree branch or crotch
where it receives natural rainfall and has good air circulation. Use it
as a tropical hanging basket specimen or as a companion to orchids in
slatted wood trays. It can be grown upon a pot of coarse tree bark
nuggets when young. Once it clumps into a rounded cluster, it can be set
on a tray or table outdoors in frost-free regions.
Tillandsia stricta way of displays are unlimited from a single plant to collections of Tillandsia plants, from terrariums and holders to more natural mounts, from vertical gardens to container gardening or gather many of Tillandsia species together and frame them in a painting-like fashion.
Tillandsia stricta way of displays are unlimited from a single plant to collections of Tillandsia plants, from terrariums and holders to more natural mounts, from vertical gardens to container gardening or gather many of Tillandsia species together and frame them in a painting-like fashion.
SUMMARY:
CHARACTERISTICS:
Foliage – green
Shape – rosette
Features – flowers
Height: 15-30cm (6-12 inch)
Foliage – green
Shape – rosette
Features – flowers
Height: 15-30cm (6-12 inch)
PROPER CARE:
Watering in rest period – moderately
Watering in active growth period – moderately
Light – bright filtered
Temperature in rest period – min 13°C max 16°C (55-61°F)
Temperature in active growth period – min 16°C max 24°C (61-75°F)
Humidity – high
Watering in rest period – moderately
Watering in active growth period – moderately
Light – bright filtered
Temperature in rest period – min 13°C max 16°C (55-61°F)
Temperature in active growth period – min 16°C max 24°C (61-75°F)
Humidity – high
Philodendron hederaceum
Common name: Heartleaf Philodendron, Heart-leaf Ivy, Philodendron, Sweetheart Plant
Family: Araceae
Synonym: Philodendron cordatum
Philodendron cuspidatum
Philodendron micans
Philodendron oxycardium
Philodendron scandens
Philodendron cuspidatum
Philodendron micans
Philodendron oxycardium
Philodendron scandens

Philodendron hederaceum
Distribution and habitat: Philodendron hederaceum
is a hemiepiphyte vine native to Central America and the Caribbean.
Most of these plants occur in humid tropical forests, but can also be
found in swamps and on river banks, roadsides and rock outcrops. Philodendron hederaceum are often found clambering over other plants or climbing the trunks of trees with the aid of aerial roots.
Description: Philodendron hederaceum is an
evergreen climber growing to 3–6m (10–20 feet), with heart-shaped glossy
leaves 10cm (4 inch) long and 8cm (3 inch) wide with 5-8cm (2-3 inch)
long leaf-stalk. The leaves have acutely pointed tips. The leaves look
slightly brownish and almost transparent when they are new, but they
quickly become deep green as they grow to maturity. Occasionally spathes
of white flowers appear in mature plants.
Philodendron means “tree loving” and many of these species
have two growth phases, a juvenile form and a mature form, which often
look very different as leaf size and shape. Container-grown specimens
almost always stay in the juvenile phase.
Houseplant care: Philodendron hederaceum is one of the easiest of all house plants to grow. It is very vigorous grower that can take a wide range of conditions.
Experienced growers recommend regular pinching out of the growing tips in order to make the Philodendron hederaceum bushy. Otherwise, the stems tend to grow too long giving the plant a skimpy look.
Try to pinch close to the node because any bare stem that is left will die, and the node will not grow a new stem. Use sharp scissors or pruners.
Try to pinch close to the node because any bare stem that is left will die, and the node will not grow a new stem. Use sharp scissors or pruners.
Water: During the active growth period water
moderately, giving enough at each watering to moist the potting mixture
throughout and allowing the top centimeter (0.4 inch) of so of the
potting mixture to dry out between waterings. During the sort midwinter
rest period water only enogh to keep the entire mixture from drying out
completely.
Philodendron hederaceum is not terribly set back by dry
indoor air, but moist air does seem to lead to larger leaves and faster
growth. Mist the plant to increase the humidity. It is best to use
purified water, minerals in tap water build up on the leaves.
Light: Philodendron hederaceum will
tolerate low light, for quite a long time, though like most “low-light”
plants, it will do better if given bright indirect light.
Temperature: Philodendron hederaceum will grow well in normal to warm indoor temperatures 24-27ºC (75-80ºF). Philodendron hederaceum cannot tolerate temperatures which drop below about 13ºC (55ºF).
Fertilise: Throughout the months while the Philodendron hederaceum is actively growing apply standard liquid fertiliser once every two weeks.
Potting and repotting: Like other houseplants,
philodendrons benefit from repotting to a larger container when they
become root bound and outgrow the original pot.
Use a combination of half soil-based potting mixture and half leaf mould or coarse peat moss. Move Philodendron hederaceum
into container one size larger only when their roots have completely
filed the current one. Do this at any time of year except during the
short rest period. After the maximum convenient pot size has been reach
(probably about 25-30cm (10-12 inch)), an annual spring top-dressing
with fresh potting mixture will help to keep the plat healthy.
Use a container with drainage holes to prevent root rot. If a
decorative container without drainage is used, then use it as a cachepot
– just slip the plain nursery pot into the cachepot. It is recommended
to cover the bottom of a cachepot with pebbles to keep the plant above
the drainage water.
Propagation: Cutting and layering are popular methods of Philodendron hederaceum
propagation. Try propagating them during the growing season. Along the
vine branches there are small brown nubs formed where the leaves meet
the stem. These nubs, when in contact with soil or water, will grow
roots. There are many ways to propagate this plant, the easiest being to
cut a branch just below a root-nub and place it in water with a few
pieces of horticultural charcoal to reduce the likelihood of rot. As
soon as new leaf growth is noted, pot in rich soil. The plant can also
be propagated within its own pot by pinning vines at the root-nub to the
soil with hairpins or bent wire. The root-nub in contact with the soil
will sprout new roots shortly. When sections of Philodendron hederaceum are rooted, the plant will greatly benefit from misting several times a day (with purified water, if possible).
Problems: No serious insect or disease problems.
Watch for aphids, spider mites, mealybugs and scale. Leaf spots may
occur. Root rot can occur in overly moist soils.
Small leaves or long spaces between leaves show that the plant is not getting enough light.
Treatment: Move the Philodendron hederaceum plant to a brighter location, but not into direct sun.
Treatment: Move the Philodendron hederaceum plant to a brighter location, but not into direct sun.
Interesting facts: There is about 200 year old discussion going on about the true name of this plant. There are still references to Philodendron oxycardium, Philodendron scandens and Philodendron cordatum in houseplant books etc., but Philodendron hederaceum
is the actual correct name. The reason for all the names, in part, is
that the plant has a really variable habit, depending on its age and
growing conditions, so specimens collected at different times and places
may differ in size, habit, coloration and texture.
Toxicity: Parts of the plant are known to contain
calcium oxalate crystals in varying concentrations. Although the plant
is known to be toxic to mice and rats, the current literature is
conflicting with regards to its toxicity in cats. Its possible toxic
effects on humans are currently unknown although likely very mild if not
harmless.
Uses: Known for their ability to thrive in low-light conditions typical of many homes and offices, Philodendron hederaceum
plants are often grown for their lush foliage. It can be grown as a
climbing or training specimen depending on whether its long stems are
trained up supports or are allowed to trail over the rims of the pots or
hanging baskets.
Philodendron hederaceum as a climbing species is usually
tried to a stake inserted into the potting mixture for support. For best
results, dress the stake in sphagnum moss until form a 5-8cm (2-3 inch)
thickness over the full length of the stake above the potting mixture
level. Alternatively, nail a piece of rough-textured cork-bark to the
stake. The sphagnum moss or cork-bark being used must then be sprayed
with water at least once a day. Doing this it will stimulate the aerial
roots of the Philodendron hederaceum to get a firm hold on this
support. Be sure that the support is tall enough to accommodate the
eventual total growth of the plant.
In the tropical and humid subtropical regions Philodendron hederaceum
can be used as a ground cover or on arbors or trellises for dependable,
soft green color and a tropical look, particularly around patios,
windowsills and pools.
Philodendron hederaceum is also noted by NASA among the best
types of houseplants for removing formaldahyde, especially higher
concentrations. It is capable to absorb between 80 and 90% of the
formaldehyde present in water-based paint, roofing felt or insulation
material, glues in fitted carpets or even laminated wood floors!
SUMMARY:
CHARACTERISTICS:
Foliage – green
Shape – climbing and trailing
Height: 3–6m (10–20 feet)
Foliage – green
Shape – climbing and trailing
Height: 3–6m (10–20 feet)
PROPER CARE:
Watering in rest period – sparingly
Watering in active growth period – moderately
Light – bright filtered
Temperature in rest period – min 13°C max 24°C (55-75°F)
Temperature in active growth period – min 13°C max 24°C (55-75°F)
Humidity – low
Watering in rest period – sparingly
Watering in active growth period – moderately
Light – bright filtered
Temperature in rest period – min 13°C max 24°C (55-75°F)
Temperature in active growth period – min 13°C max 24°C (55-75°F)
Humidity – low
Catharanthus roseus
Common name: Madagascar Periwinkle, Rose Periwinkle, Old Maid, Chula, Chatas, Vinca
Family: Apocynaceae
Synonymous: Vinca rosea (basionym)
Ammocallis rosea
Lochnera rosea
Ammocallis rosea
Lochnera rosea

Catharanthus roseus
Distribution and habitat: Catharanthus roseus
is an evergreen shrubs or herbaceous plant, sprawling along the ground
or standing erect to 1m (3 feet) in height, native and endemic to
Madagascar where its natural habitat was almost been lost. It was found
growing on sand and limestone soils in woodland, forest, grassland and
disturbed areas.
This herb is now common worldwide as ornamental plant. It is naturalized in most tropical and subtropical regions being escaped from cultivation, spreading in rocky outcrops and roadsides in dry savanna, urban open spaces and in cultivated areas.
This herb is now common worldwide as ornamental plant. It is naturalized in most tropical and subtropical regions being escaped from cultivation, spreading in rocky outcrops and roadsides in dry savanna, urban open spaces and in cultivated areas.
Description: Catharanthus roseus is a small,
upright shrub prized for its shiny green leaves and delicate looking
flowers. The glossy oval leaves are 2-5cm (0.8-2 inch) long, have a
white centre vein and are borne in opposite pairs on slender stems. One
or more flowers are produced at the stem tips throughout a flowering
period that generally lasts from mid-spring to early autumn. Each flower
has a 1cm (0.4 inch) long tube flattened out into five lance-shaped
petals at the month, which is up to 4cm (1.5 inch) wide. Flower colour
is usually soft rose-pink or occasionally, mauve.
These plants may self-seed in optimum growing conditions.
These plants may self-seed in optimum growing conditions.
Houseplant care: Catharanthus roseus plants
are usually acquired in early spring and discarded when the flowering
season has ended. They are not normally worth overwintering because only
young plants tend to look healthy and flower profusely when grown
indoors.
Pinch it back early in the season to encourage branching and a fuller plant.
Pinch it back early in the season to encourage branching and a fuller plant.
Light: Bright light, included three or four hours of direct sunlight daily, is essential for good flowering.
Temperature: Normal room temperatures are suitable at all times. Catharanthus roseus cannot tolerate temperatures that fall below about 10°C (50°F).
Watering: Water the potting mixture plentifully, but do not allow the pot to stand in water.
Feeding: Once flowering has begun, apply standard
liquid fertiliser every tow weeks. These plants are not tolerant of
excessive fertiliser.
Potting and repotting: Use soil based potting
mixture when repotting these plants. Move them into pots one size larger
every six to eight weeks. Probable maximum size needed is 10-13cm (4-5
inch).
Gardening: Catharanthus roseus is a tender
plant and does not withstand frosts. It is best grown indoors in
temperate climates. It thrives well in hot and humid environments, but
it tolerates the hot temperatures in summer and it is also able to bear
the extremes of drought and heavy rainfall.
In frostfree climates it develops a woody stem near the base and can get 0.6-1m (2-3 feet) tall and spread out just as wide. As annuals, they are usually smaller and more prostrate.
Pinch back early in the season to encourage branching and a fuller plant. The flowers drop off when they finish blooming, so no deadheading cleaning is needed.
Position: Catharanthus roseus should be
planted in full sun or partial shade to promote flowers all year round
in hot climates. They do best with some shade during at least some of
the day during summer. They start to look a little frazzled by the end
of the day without some shade and tend to get somewhat leggy when they
get a lot of sun. A shady spot will promote lush foliage, but part sun
seems to be their favorite spot, to obtain good foliage and plenty of
blooms.
Soil: Catharanthus roseus plants are best
grown as annual bedding plants in well-drained sandy loams. Superior
soil drainage is the key to growing this annual well. Flowering will
suffer if soils are too fertile.
The planting distance should be about 30cm (12 inch) between plants.
The planting distance should be about 30cm (12 inch) between plants.
Irrigation: They need regular moisture, but avoid overhead watering. Catharanthus roseus
plants should be watered moderately during the growing season, but it
is relatively drought resistant once established. They will recover
after a good watering.
Fertilising: Catharanthus roseus plants are
not heavy feeders. If necessary, feed fortnightly or once monthly with a
balanced liquid fertilizer. Too much fertilizing will produce luxuriant
foliage instead of more blooms.
Propagation: Catharanthus roseus can be
propagated from tip cuttings as well as from seed, since plants grown
this way will flower more profusely. Take a 5-8cm (2-3 inch) long tip
cuttings of new growth in late spring or summer. Trim each cutting
immediately below a leaf, dip the cut end in hormone rooting powder and
plant it in 5 or 8cm (2-3 inch) pot containing a moistened well drained
potting mixture. Enclose the whole in a plastic bag or propagating case
and stand it in bright filtered light. After rooting occurs (generally
in three to four weeks), treat the rooted cutting as a mature plant.
In late winter or early spring, sow a few seeds in a shallow tray of moistened rooting mixture, place the tray in a plastic bag or propagating case and stand it in warm position where it will get bright filtered light. When the seeds have germinated – in two to three weeks – uncover the tray and begin watering the seedlings moderately – enough to make the potting mixture moist, but allowing the top 1cm (0.4 inch) to dry out between waterings – until they are about 1cm (0.4 inch) high. Transfer each seedling into an 8cm (3 inch) pot of potting mixture and treat it as mature Catharanthus roseus.
Outdoors, it will reseed itself if the soil is loose.
Problems:
Stem rot, leaf spot and aster yellows may occur.
Treatment: Avoid overwatering and soggy conditions. Use suitable fungicide to treat these diseases.
Stem rot, leaf spot and aster yellows may occur.
Treatment: Avoid overwatering and soggy conditions. Use suitable fungicide to treat these diseases.
Watch for slugs and snails.
Treatment: These pests are controlled using an appropriate molluscicide, both pellet and liquid forms or by hand pick at regular inspections.
Treatment: These pests are controlled using an appropriate molluscicide, both pellet and liquid forms or by hand pick at regular inspections.
Recommended varieties:
Catharanthus roseus cv. ‘Albus’ is a white-flowered form.
Catharanthus roseus cv. ‘Albus’ is a white-flowered form.
Catharanthus roseus cv. ‘Ocellatus’ has white flowers with a brilliant, carmine-red centre.
Toxicity: Catharanthus roseus is poisonous if
ingested or smoked. It has caused poisoning in grazing animals. Even
under a doctor’s supervision for cancer treatment, products from this
plant produce undesirable side effects.
Uses and display: Catharanthus roseus makes
excellent bedding or border plant for summertime annual or perennial
garden. It is great as a ground cover, planted en masse with different
colours or in mixed plantings. It is perfect for raised planters,
containers or hanging baskets to display its colorful beauty at decks,
patios, garden porches, windowsills and balconies. This plant is
attractive to butterflies too. Certain varieties can be grown as a
houseplant in a brightly lit location. Cut branches can be used as vase
arrangement in homes.
Catharanthus roseus is grown commercially in the pharmaceutical industry.
SUMMARY:
CHARACTERISTICS:
Foliage – green
Features – flowers
Shape – bushy
Height: 1m (3 feet)
Foliage – green
Features – flowers
Shape – bushy
Height: 1m (3 feet)
PROPER CARE:
Watering in active growth period – plentifully
Light – bight
Temperature in active growth period – min 10oC max 24oC (50-75oF)
Watering in active growth period – plentifully
Light – bight
Temperature in active growth period – min 10oC max 24oC (50-75oF)
Humidity – low
الجمعة، 22 أبريل 2016
How to store food safely

Proper storage of food reduces the risk of food poisoning. Follow these tips to ensure your food is always safe to eat.
Fridge storage
Some foods need to be kept in the fridge to help stop bacteria growing. These include foods with a "use-by" date, cooked foods and ready-to-eat foods, such as desserts and cooked meats.Here's how to prevent bacteria from growing:
- Keep your fridge temperature at 5C or below. Most fridges are warmer than you think.
- When preparing food, keep it out of the fridge for the shortest time possible.
- If you're having a buffet, keep the food refrigerated until you're ready to serve it.
- Cool down leftovers as quickly as possible (ideally within 90 minutes), store them in the fridge and eat them within two days.
- Store eggs in their box in the fridge.
- Never put open cans in the fridge, as the metal may transfer to the can's contents – place the contents in a storage container or covered bowl instead.
"If the food is still hot, it will raise the temperature in the fridge, especially older models, which isn't safe as it can promote bacterial growth."
It is safe to let food cool completely before storing it in the fridge, so long as basic food hygiene is applied to avoid cross-contamination. When re-heating food, make sure to cook until steaming hot.
Clean your fridge regularly to ensure it remains hygienic and in good working condition.
"Food debris accumulates over time and can increase the risk of cross-contamination," says Hudson.
'Use-by' dates
No food lasts forever, however well it is stored. Most pre-packed foods carry either a "use-by" or a "best before" date.- "Use-by" dates appear on foods that go off quite quickly. It can be dangerous to eat foods past this date.
- "Best before" dates are for foods with a longer life. They show how long the food will be at its best quality.
Storing meat
It's particularly important to store meat safely in the fridge to stop bacteria from spreading and avoid food poisoning.- Store raw meat and poultry in clean, sealed containers on the bottom shelf of the fridge, so they can't touch or drip onto other food.
- Follow any storage instructions on the label and don't eat meat after its use-by date.
- Keep cooked meat separate from raw meat.
Freezing and defrosting
It's safe to freeze meat and fish as long as you:- freeze it before the use-by date
- defrost meat and fish thoroughly before cooking – lots of liquid will come out as meat thaws, so stand it in a bowl to stop bacteria in the juice spreading to other things
- defrost meat and fish in a microwave if you intend to cook it straight away, or put it in the fridge to thaw so it doesn't get too warm
- cook food until it's piping hot all the way through
"Date and label meat in the freezer and eat it within 24 hours of defrosting. Don't keep food in a freezer indefinitely. Always have a good idea of what's in your fridge and freezer."
Re-freezing
Never re-freeze raw meat (including poultry) or fish that has been defrosted. It is possible to re-freeze cooked meat once, as long as it has been cooled before going into the freezer. If in doubt, don't re-freeze.Frozen raw foods can be defrosted once and stored in the fridge for up to two days before they need to be cooked or thrown away. To reduce wastage, divide the meal into portions before freezing and then just defrost what you need.
Cooked food that has been frozen and removed from the freezer must be reheated and eaten immediately once fully defrosted. When defrosted, food should be reheated only once, because the more times you cool and reheat food, the higher the risk of food poisoning. Bacteria can grow and multiply when food is cooled too slowly, and might survive if food isn't reheated properly.
When reheating food, make sure it is heated until it reaches a temperature of 70C for two minutes, so that it is steaming hot throughout.
Foods stored in the freezer, such as ice cream and frozen desserts, should not be returned to the freezer once they have started to thaw. Only take out of the freezer what you intend to use for that meal.
Re-using bags
With more and more people re-using carrier bags, whether for environmental reasons or to avoid paying for new ones, the following tips will help prevent bacteria spreading to ready-to-eat food:- Keep raw meat and fish separate from ready-to-eat foods in separate bags.
- If you use re-useable bags, keep one or two just for use with raw meat and fish and don't use the same bags for ready-to-eat foods.
- Re-useable bags (and single-use carrier bags) should be disposed of if there are spillages of raw meat juices.
الخميس، 21 أبريل 2016
Healthy Foods
Healthy Foods That Are Making You Fat


Let’s face it: It’s a challenge to eat well and sort through the
reams of various diets out there. Even the best of us cannot always
deny the gleam of a shiny glazed donut or the crunch of a perfectly
salted potato chip.
But what if some of the so-called “healthy foods” we’ve been told to
eat all these years are actually saboteurs to our already strict and
restrictive diets, causing frustration and unsightly weight gain?
This is precisely the subject of a fascinating book, THE PLAN, by
Lyn-Genet Recitas, who purports that there are “healthy foods” that
cause a negative response in our bodies, causing us to gain bloat and
weight.
Here are some of the usual suspects (tell me if you are not as shocked as I was!)
- OATMEAL – I almost cried when I read this. I love oatmeal and was eating it every other day. However, I did notice my stomach always felt unwell and nauseous after I ate it. Turns out, 85% of people are reactive to oatmeal. It only helps to reduce cholesterol if this is a “friendly” food your body can digest, otherwise, it will negatively impact your health or even raise your cholesterol!
- SALMON – Superfood? Not necessarily. Again, this omega rich food has an 85% reactivity rate.
- Upset you’ll have to give up all these yummy, healthy foods? It gets worse…Check out the rest of the list of highly reactive foods (this is just a sample – there are many more!!!)
- ASPARAGUS
- TOMATO SAUCE
- TOFU
- BLACK BEANS
- TURKEY
- SHRIMP
- GREEK YOGURT
- CAULIFLOWER
- SUSHI
Sufficed to say this list has dramatically whittled my already restrictive diet down to zero.
But why are these foods potentially so bad for you?
The problem? INFLAMMATION.
Yes, Recitas writes that these foods may be healthy in a vacuum, but
combined with our unique body chemistry, they can be quite toxic. And
doctors are starting to acknowledge that inflammation is the underlying
cause behind all disease and health issues.
She outlines a plan with a 3-day cleanse (almost like an elimination
diet) to rebalance your body and then slowly re-introduce foods in a
controlled manner to monitor your weight and body response.
I highly recommend reading this book for more information. Even if
just for the theory or concept behind it. I can tell you my belly bloat
has been significantly reduced over the last year once I determined
which healthy foods were actually causing my body to have an
inflammatory response and I’ve adjusted my lifestyle accordingly
cats
The cat

- Cats have been domesticated for around 4,000 years. While they were once valued for their hunting abilities, they are now valued for their companionship and loving behaviour.
- While not well known, the collective nouns used for cats and kittens are a clowder of cats and a kindle of kittens.
- Our domestic cats are known as little cats. They differ from large cats such as lions and tigers because they are naturally active at night and can purr.
- Cats are now the most popular pet in the UK and in the US.
The feline body & behaviour
With 48 recognised cat breeds and pedigrees in
Australia plus an endless combination of cross breeds it's amazing just
how different each cat can look and behave. But there are many amazing
physical characteristics that all cats possess, read on for more
fascinating facts about your feline friend.
- Cats have 30 teeth (dogs have 42) and most of us know how sharp they are!
- Cats have a reflective layer in their eyes, known as the tapetum lucidum, which magnifies incoming light allowing them to see up to 6 times better than humans can in low light. Cats (as well as dogs) also have a ‘third eyelid’ called the nictitating membrane which is found on the inside corner of the eye which is an extra protective function of the eye.
- Cats have 32 muscles in their ears (humans have only 12). This gives the ear mobility, enabling it to precisely locate prey such as mice or the opening of their cat food! Cats can also hear frequencies that are both below and above those that can be heard by humans. The ear also has the job of helping to maintain balance and the ability to right themselves when falling – which is where the phrase “Cats always land on their feet” came from.
- More cats are left-pawed than right.
- The texture of cat food is more important to cats than taste and cats can often be quite fussy about the smells of food. If your cat have ever licked you, you might compare the feel of their tongue to that of coarse sandpaper – that’s because a cats' tongue is covered in tiny backwards facing thorn like barbs that guide food to the back of the mouth. These rough tongues are also perfectly designed for grooming and lapping up water.
- Cats can retract their front claws. This keeps them sharp so they can be used for climbing and of course, as effective weapons!
- Cats rub against us and scratch as a form of communication. They have scent glands on their cheeks and paws, so rubbing against us or scratching on vertical surfaces transfers their scent.
- Around 75% of cats respond to catnip. This herb stimulates those cats that are genetically programmed to respond.
- Those long whiskers around your cats' mouth and face which form a vital part of their sense of touch. These whiskers are attached to nerve cells and are used to judge the size of openings as well as providing your cat information about everything he/she touches, as well as shifts in air pressure.
- Cats can travel at speeds of up to 30km per hour.
- The largest breed of cat in Australia is the Maine Coon. Males can regularly weigh up to 12kgs!
Feline- human relationship
- Cats are good for our health. People who own cats have a lower risk of cardio-vascular disease than non-cat owners. Elderly cat owners suffer less from depression and loneliness than non-cat owners.
- Cats can be trained. Teach your cat to share a “high five” with you by rewarding her with a special treat every time she lifts her paw.
- Cats need to interact with people from two weeks of age to enable them to be social towards humans. After 16 weeks of age it is very difficult to tame a cat.
- Psychological studies have shown that cat owners are more logical and practical than dog owners. They tend to be more introverted than dog owners. Cat owners, however, tell more stories about their cats than dog owners.
- The record number of cats kept by any one person was by an owner named Jack Wright, from Ontario, Canada who kept 689 cats!
الثلاثاء، 19 أبريل 2016
Basic Facts About Kangaroos


Basic Facts About Kangaroos
Kangaroos are the largest living marsupials from the family Macropodidae. There are four species commonly referred to as the kangaroo: the red kangaroo, the eastern grey kangaroo, the western grey kangaroo, and the antilopine kangaroo.
Diet
Kangaroos are grazing herbivores, which means their diet consists
mainly of grasses. They can survive long periods without water.
Range
Kangaroos are found in Australia and Tasmania, as well as on surrounding islands. Kangaroos live in varied habitats, from forests and woodland areas to grassy plains and savannas.
Behavior
Kangaroos live and travel in organized groups or "mobs," dominated by
the largest male. Male kangaroos are called boomers, bucks or jacks;
females are does, flyers, or jills, and the young ones are joeys. The
collective noun for kangaroos is a mob, troop or court.
Reproduction
Usually, female kangaroos give birth to one joey at a time. Newborns weigh as little as 0.03 ounces at birth - as small as a lima bean!
After birth, the joey crawls into its mother's pouch, where it will
nurse and continue to grow and develop. Red kangaroo joeys do not leave
the pouch for good until they are more than eight months old. Gray
kangaroo joeys wait until they are almost a year old.
Rose

Rose shrubs come in a variety of forms, from
miniature to climbing. They are grown for their attractive and often
fragrant flowers, which bloom mainly in early summer and fall..
One way to group roses into classes is according to their date of introduction:
- Old roses are those introduced prior to 1867. These are the lush, invariably fragrant roses found in old masters’ paintings. There are hundreds of old rose varieties—whose hardiness varies—providing choices for both warm and mild climates.
- Modern hybrid roses are sturdy, long-blooming, extremely hardy and disease-resistant, and bred for color, shape, size, and fragrance.
- Species, or wild, are those that have been growing wild for many thousands of years. These wild roses have been adapted to modern gardens and usually bloom in the spring.
Choosing from all the possibilities can be a daunting task. Take
your time and wander through nurseries and page through mail-order
catalogs and Web sites.
Planting
Preparing the Soil
Roses prefer a near-neutral pH range of 5.5–7.0. A pH of 6.5 is just about right for most home gardens (slightly acidic to neutral).An accurate soil test will tell you where your pH currently stands. Acidic (sour) soil is counteracted by applying finely ground limestone, and alkaline (sweet) soil is treated with ground sulfur.
Before you plant, be sure that you choose varieties proven in your climate. When in doubt, All-America Rose Selections winners are good bets. Or check with your local nursery.
Ordering Plants
If you order roses from a mail-order company, order early, in January or February (March at the latest). They are usually shipped in the spring as bare roots when plants are fully dormant, well before they have leafed out. They’ll look like a bundle of sticks on arrival. Note, they are not dead—simply dormant.If you are buying container-grown roses (vs. bare-root roses), plant them by May or early June for best results.
Planting Tips
- Plant roses where they will receive a minimum of 5 to 6 hours of full sun per day. Roses grown in weak sun may not die at once, but they weaken gradually. Give them plenty of organic matter when planting and don’t crowd them.
- Wear sturdy gloves to protect your hands from prickly thorns. Have a hose or bucket of water and all your planting tools nearby. Keep your bare-root rose in water until you are ready to place it in the ground.
- Roses can be cut back and moved in either spring or fall, but not in midsummer, as they might suffer and die in the heat. Large rose canes can be cut back by as much as two thirds, and smaller ones to within 6 to 12 inches of the ground.
- When you transplant your roses, be sure to dig a much bigger hole than you think you need (for most types, the planting hole should be about 15 to 18 inches wide) and add plenty of organic matter such as compost or aged manure.
- Some old-timers recommend placing a 4-inch square of gypsum wallboard and a 16-penny nail in the hole to provide calcium and iron, both appreciated by roses.
Care
Watering Roses
- Diligently water your roses. Soak the entire root zone at least twice a week in dry summer weather. Avoid frequent shallow sprinklings, which won’t reach the deeper roots and may encourage fungus. Roses do best with 90 inches of rain per year, so unless you live in a rain forest, water regularly.
- Roses love water—but don’t drown them. That is, they don’t like to sit in water, and they’ll die if the soil is too wet in winter. The ideal soil is rich and loose, with good drainage. One of the worst mistakes you can make is to not provide adequate drainage.
- Use mulch. To help conserve water, reduce stress, and encourage healthy growth, apply a 2- to 4-inch layer of chopped and shredded leaves, grass clippings, or shredded bark around the base of your roses. Allow about an inch of space between the mulch and the base stem of the plant.
Feeding Roses
- Feed roses on a regular basis before and throughout the blooming cycle (avoid chemical fertilizers and pesticides if you’re harvesting for the kitchen).
- Once a month between April and July, apply a balanced granular fertilizer (5-10-5 or 5-10-10). Allow ¾ to 1 cup for each bush, and sprinkle it around the drip line, not against the stem.
- In May and June, scratch in an additional tablespoon of Epsom salts along with your fertilizer; the magnesium sulfate will encourage new growth from the bottom of the bush.
Pruning Roses
- Prune roses every spring and destroy all old or diseased plant material. Wear elbow-length gloves that are thick enough to protect your hands from thorns or a clumsy slip, but flexible enough to allow you to hold your tools. Always wear safety goggles; branches can whip back when released.
- Start with pruning shears for smaller growth. Use loppers, which look like giant, long-handle shears, for growth that is more than half an inch thick. A small pruning saw is handy, as it cuts on both the push and the pull.
- Deadhead religiously and keep beds clean. Every leaf has a growth bud, so removing old flower blossoms encourages the plant to make more flowers instead of using the energy to make seeds. Clean away from around the base of the rosebushes any trimmed debris that can harbor disease and insects.
- Late in the season, stop deadheading rugosas so that hips will form on the plants; these can be harvested and dried on screens, away from sunlight, then stored in an airtight container. Stop deadheading all your rose plants 3 to 4 weeks before the first hard frost so as not to encourage new growth at a time when new shoots may be damaged by the cold.
Winterizing Roses
- Do not prune roses in the fall. Simply cut off any dead or diseased canes.
- Stop fertilizing 6 weeks before the first frost but continue watering during dry autumn weather to help keep plants fortified during the dry winter.
- Mound, mulch, or add compost after a few frosts but before the ground freezes. Where temperatures stay below freezing during winter, enclose the plant with a sturdy mesh cylinder, filling the enclosure with compost, mulch, dry wood chips, pine needles, or chopped leaves.
- Don’t use heavy, wet, maple leaves for mulch. Mulch instead with oak leaves, pine needles, compost, or straw.
- Clean up the rose beds to prevent overwintering of diseases. One last spray for fungus with a dormant spray is a good idea.
الاثنين، 18 أبريل 2016
begonia

How to Grow Begonias in the Annual Garden
Known as wax begonias or bedding begonias, annual begonia plants (Begonia semperflorens) grow quickly and easily fill in spaces in the garden that will benefit from attractive foliage and frilly flowers. They can be a focal point when planted in mass and are excellent specimens for container combinations. Annual begonia plants are also deer resistant, so keep them in mind for trouble spots in the landscape.Plant wax begonias in a full sun to shaded location. Full sun locations during hot summer days may stress annual begonia plants, making them susceptible to disease. Therefore, in areas where summers are exceptionally hot, plant wax begonias where they will get afternoon shade.
Annual Begonia Care
Once appropriately placed in the flower bed or hanging basket, deadheading spent blooms and keeping the soil moist is the basis of annual begonia care.Read more at Gardening Know How: Bee Balm Flower Plant – How To Plant Bee Balm And Bee Balm Care http://www.gardeningknowhow.com/ornamental/flowers/bee-balm/bee-balm-care.htm
الجمعة، 15 أبريل 2016
7 interesting koala facts you have to know


